


Switching Okai Vehicles to Levy Server
Below is a step-by-step guide in the correct order of operations. First, use the Modify Mode software. Then, proceed with the ZK Tool to send the relevant AT commands.
1. Using the “Modify Mode” Software
1. Close ZK Tool
•Make sure the ZK Tool is not running to avoid USB port conflicts.
2. Launch Modify Mode
•Open the Modify Mode software.
•Select the correct USB serial port.
•Click Open Port (or its equivalent).
3. Enter IMEI
•Input the correct IMEI information.
•Click Enter (or its equivalent) to confirm.
•The software will automatically switch the device into IoT mode, then display a success/failure message.
4. Finish and Close Modify Mode
•After confirmation, you can exit the Modify Mode software.
(Video instructions for this step are included in the software you received.)
2. Using the ZK Tool
1. Launch ZK Tool
•Ensure Modify Mode is closed.
•Open the ZK Tool and enter the current IoT password (Leoride2021) to log in.
2. Open the Command Page
•Press Ctrl + L (or the appropriate shortcut) to access the command entry screen.
3. Change the IoT Password
•Send the following command to change the IoT password:
[
AT+GTCFG=Leoride2021,zk200,,,,,,,,,,,,,,,FFFF$
]
•After sending it, exit the ZK Tool.
4. Re-Login with the New IoT Password
•Reopen the ZK Tool and log in using the new password.
5. Adjust Reporting and IP Settings
•Press Ctrl + L again to open the command page.
• Fixed-Time Reporting:
[
AT+GTFRI=zk200,1,0,60,10,240,,,,,FFFF$
]
• IP Switch:
[
AT+GTQSS=zk200,okai.co,,,,,,34.240.50.4,7780,,,,,,,,FFFF$
]
6. Restart the IoT Device
•Finally, send the command to restart the device:
[
AT+QFCT=0803
]
Following these steps in order will ensure you successfully switch to IoT mode, change the password, configure reporting and IP details, and restart the device.
Detailed steps for establishing the initial connection below.
--------------------------
When you receive our scooters/ E-bikes, Please charge them first then activate the IoT (Poke the IoT concealed button for
~10 seconds), IoT will wake up in normal mode (for Mass production vehicles). In order to configure the IoT using debugging software IoT need to be switched to test mode.
If your IoT is already connected to server, you can convert IoT into test mode from your server. If you can’t switch it from your server, please contact OKAI FAE to switch the work mode of IoT.
To check IoT current status please refer the following table:
ZK Series LED Definition
No.
White LED
Red LED
Description
1
OFF
OFF
In INACTIVE mode
2
Alternating Flashing
In TEST mode
3
ON (Breathing)
OFF
In Normal mode:Normal
4
OFF
Flashing
In Normal mode:ECU fault
5
OFF
ON
In Normal mode:IOT fault
Prerequisites:
PC with ZK1 series debugging software (ZK manage tool) installed in it.
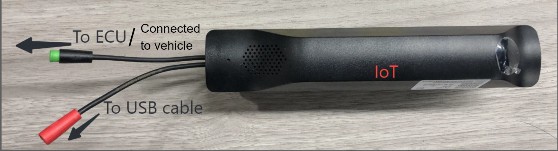
IoT USB- Debugging Cable ( shown in figure below).
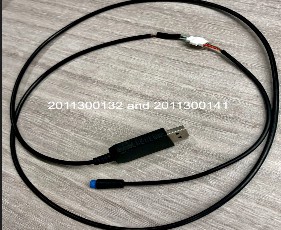
ZK1 Series Debugging Cable
Procedure:
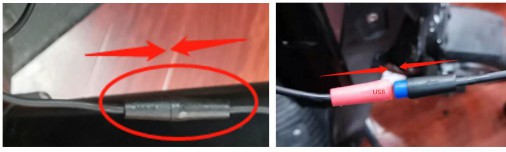
Before starting, IoT need to be taken out from the scooter/E-bike fixture to access the debugging cable. Please follow the respective SOP for IoT disassembly or ask OKAI representative about it.
Connect the IOT (in test mode) with the scooter/ E- bike and the USB cable respectively. Your connection should be as shown in figures below:
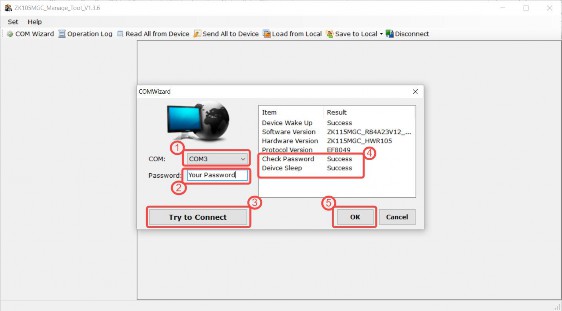
Open ZK1 series debugging software in your laptop. Select the correct COM port and insert your correct password in
Password field and then click Try to connect button
After successful connectivity (As highlighted in picture below with label 4) press OK
Navigate to Server Connection → Quick Start Setting and then press Read button to read the current set configuration

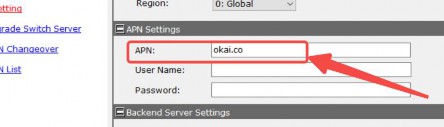
If you are using OKAI’s sim card APN should be ‘okai.co’. If you want to change the sim card to your own sim card it is necessary to modify this APN value to your own SIM card APN :
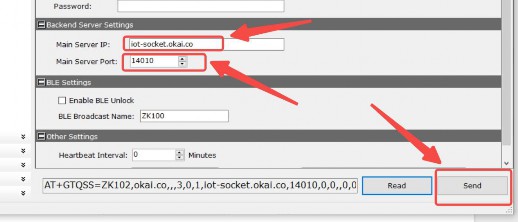
Write your server IP in Main Server IP field and server port in Main Server Port field
After setting the correct APN, IP and Port click Send button to set the configuration, IOT will be rebooted and will be connected to your server after approximately 30-90 seconds (Re-connection time depends upon the current signals strength)
After IoT successfully connected to your server please convert the IoT work mode back to the normal mode from your server using mode switch command:
AT+GTXWM=Password,01,,,,,,FFFF$ (‘Password’ should be replaced with your own password)
Please follow all above steps carefully. In case of any abnormality during the above mentioned process, please contact OKAI tech team.
Was this article helpful?
Related Articles
Unlocking the battery compartment lock of the vehicle (Okai / Segway)
If the battery needs to be swapped, what you're going to do is change its status to "charging." This will electronically unlock the battery compartment,...
Replacing the IoT on the Okai ES400 Scooter / Bike
Repair part: IOT Tools list: T20 bit (T20*75mm) Hollow plum blossom bit Electric screwdriver Disassembly steps (Working Hours: 1...
How does your rental fleet program work?
Levy Fleets is primarily a software and services package that we offer to 3rd party operators looking to launch their own scooter or bike rental fleet.