Segway Max Error Codes
In this article we will discuss the known list of error codes for the Segway Ninebot Max Scooters and what to do as an attempt to fix them.
For each error code we will list:
The Error Code
What the Error code means
A summary of the issue and what to try to fix the error
A image outlining the repair that would need to be done
Error Code 10
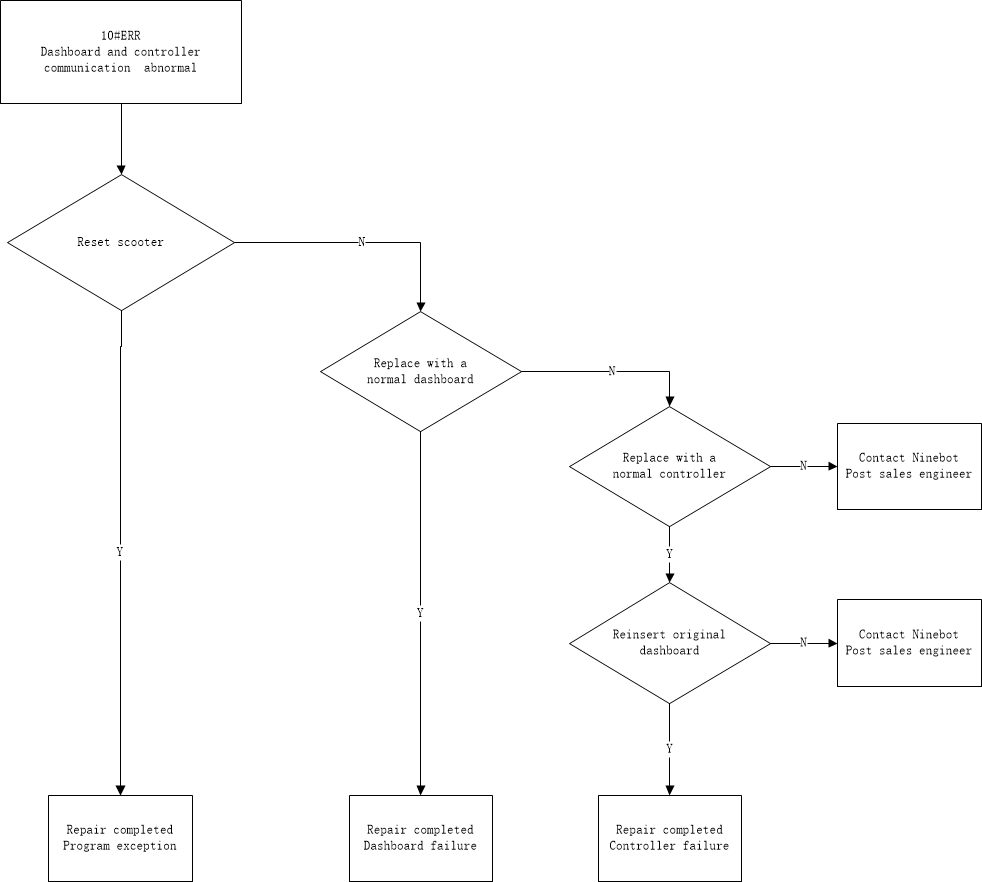
Communication abnormality between the display and the main control board.
When error 10 is shown if the LCD can not communicate with the controller. First try resetting the scooter. If that does not work, try unplugging the dashboard and then plugging it back in. This may cause it to begin working again but it may resume flashing 10 one it is powered on. If that doesn't work flashing or updating the firmware should be attempted. If the issue still persists, replace the LCD or controller, in that order.
Error Code 11
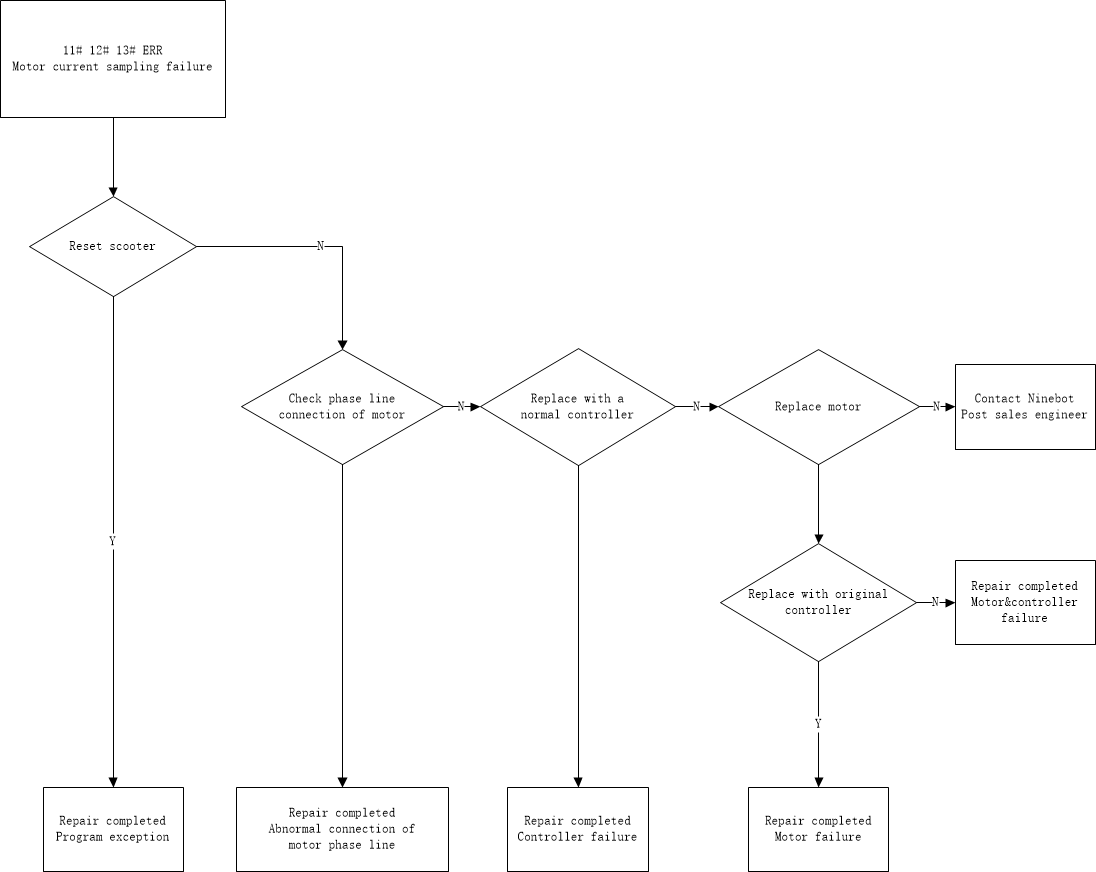
Motor A-phase current sampling abnormality.
When error 11 is shown if the motor is not reading properly. First check the phase line of the motor for any fraying, clips, kinks, or cuts. If there is no issue with the phase line then replace the controller and if the issue persists, replace the motor.
Error Code 12
Motor B-phase current sampling abnormality.
When error 12 is shown if the motor is not reading properly. First check the phase line of the motor for any fraying, clips, kinks, or cuts. If there is no issue with the phase line then replace the controller and if the issue persists, replace the motor.

Error Code 13
Motor C-phase current sampling abnormality.
When error 13 is shown if the motor is not reading properly. First check the phase line of the motor for any fraying, clips, kinks, or cuts. If there is no issue with the phase line then replace the controller and if the issue persists, replace the motor.

Error Code 14
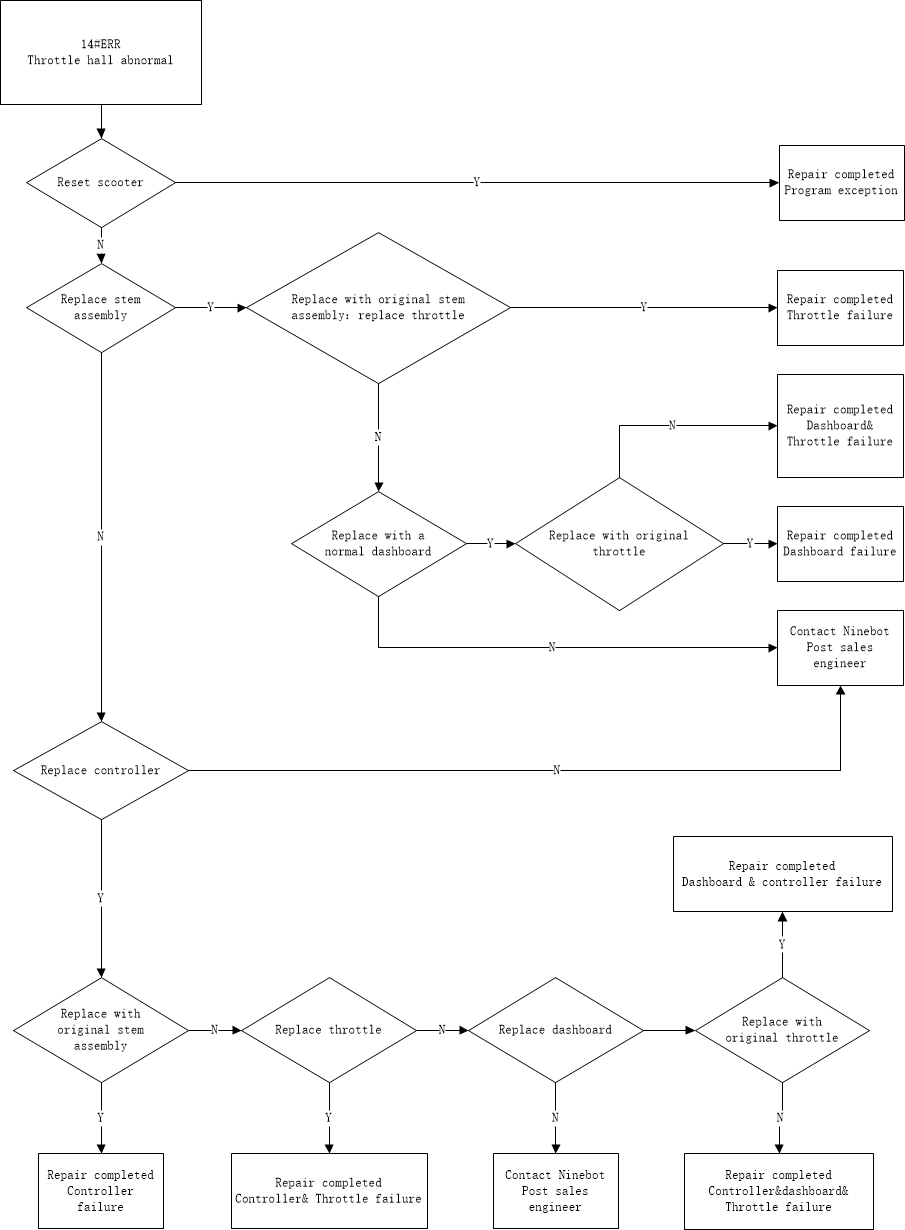
Throttle Hall sensor abnormality.
When error 14 is probably the most common error code. We have a whole article dedicated to this error code here.
Error Code 15
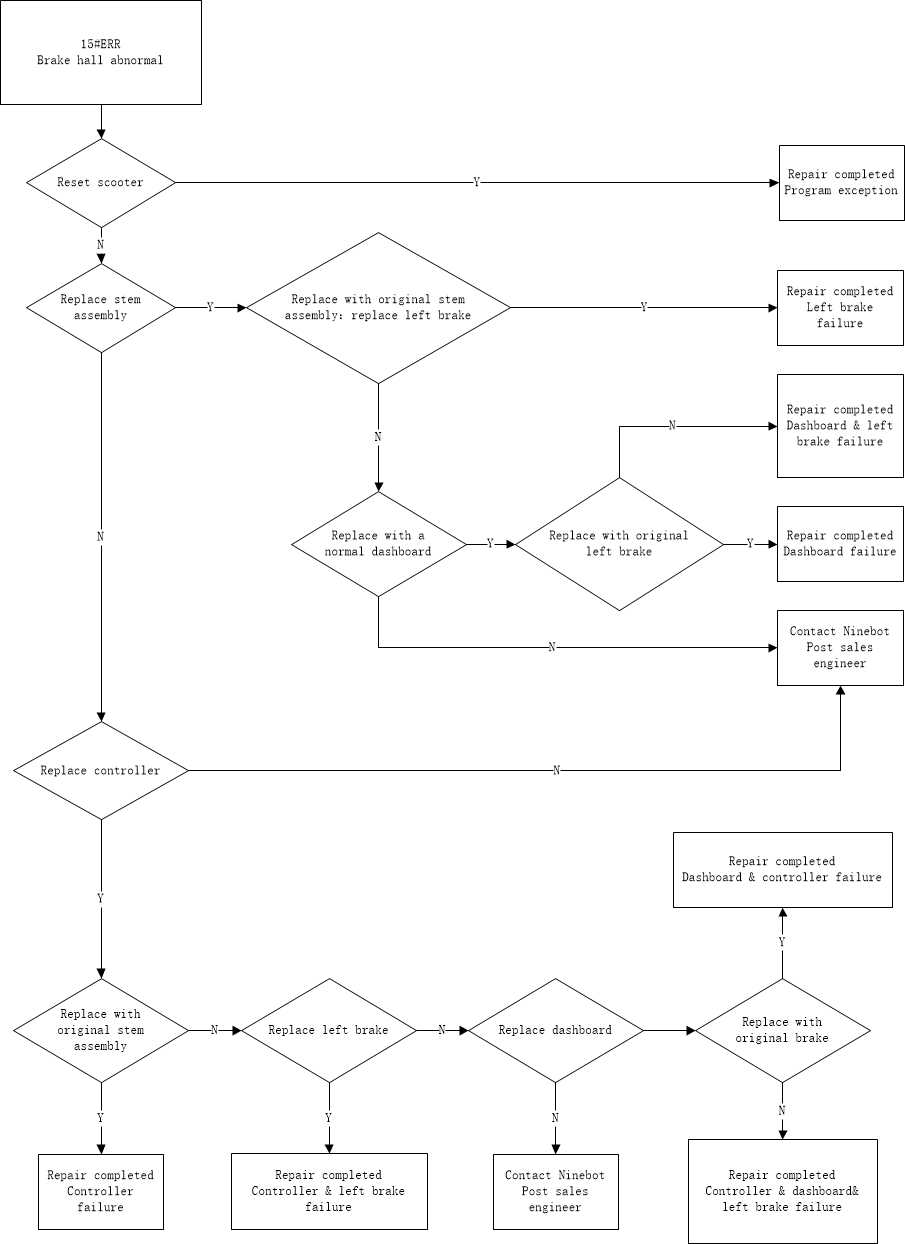
Left Brake Hall sensor abnormality.
When error 15 is shown when the brake hall sensor on the left side is not reading properly. You can usually replicate the issue by holding down the brake handle while the scooter is booting up. This error can also be caused by the magnets coming dislodged from inside the brake. There are many steps to try fixing this issue. Please see the image below.
Error Code 16
Brake Hall sensor abnormality on the right side.
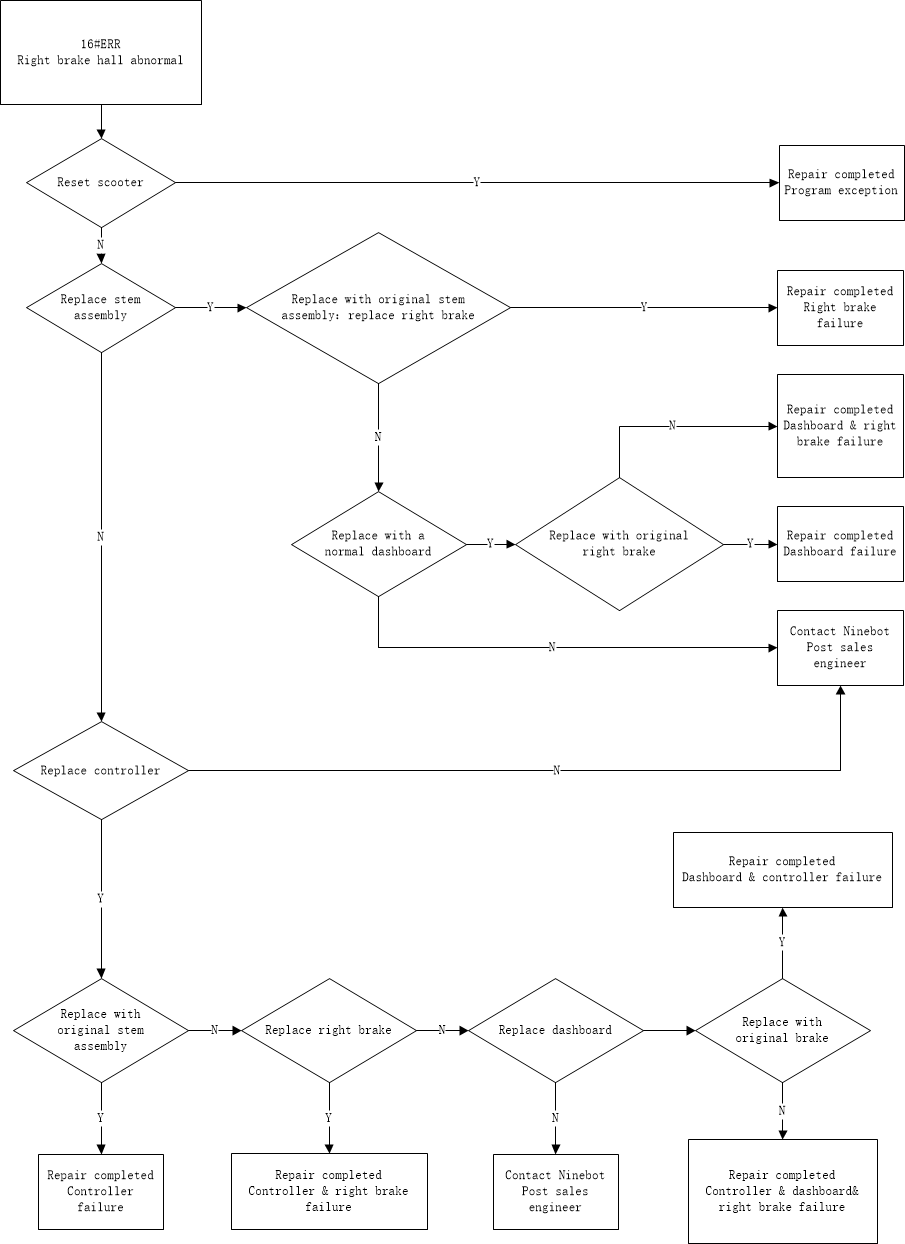
When error 16 is shown when the brake hall sensor on the right brake handle is not reading properly. You can usually replicate the issue by holding down the brake handle while the scooter is booting up. This error can also be caused by the magnets coming dislodged from inside the brake. There are many steps to try fixing this issue. Please see the image below.
Error Code 18
Motor Hall sensor abnormality.
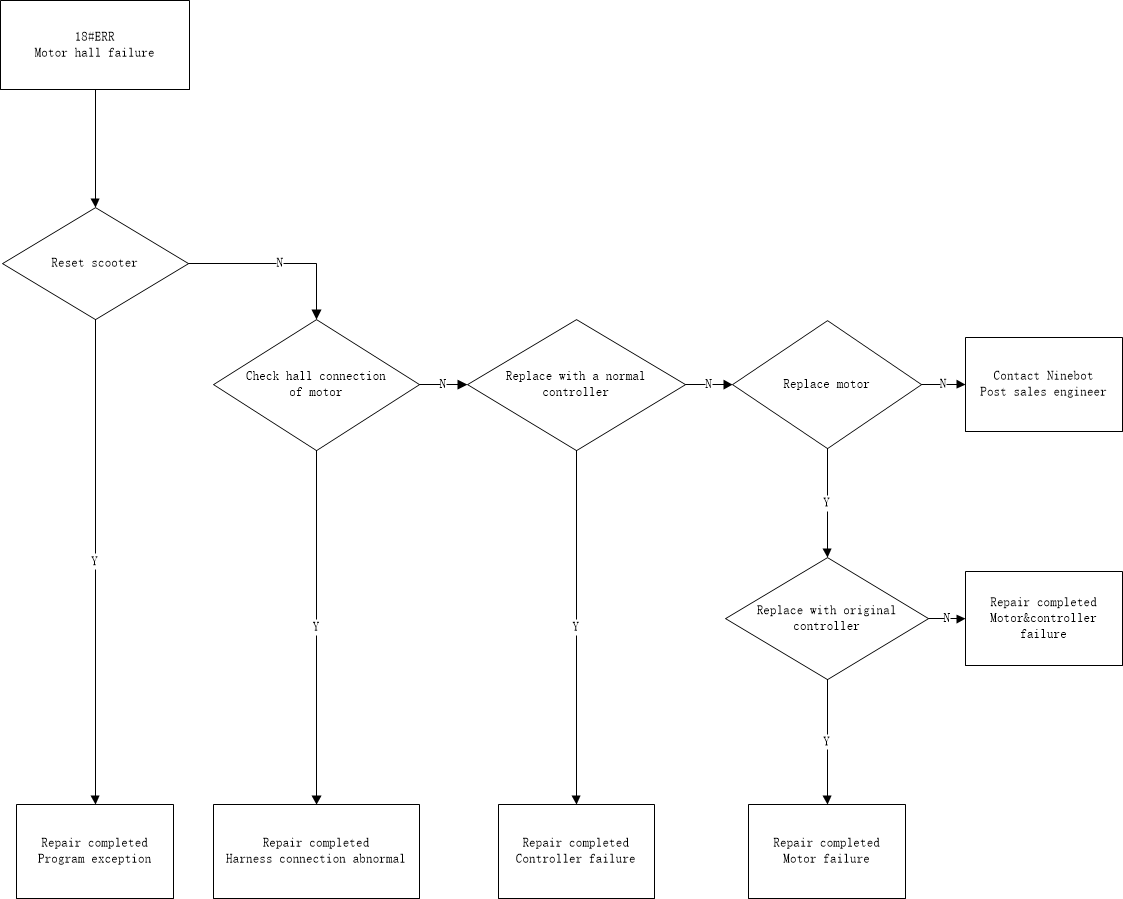
When error 18 is shown when the scooter detects an abnormal reading from the hall sensors in the motor. This can be due to an unplugged cable, or a blown sensor/resistor. Check the 5-pin hall connector of the motor and visually inspect that it is still connected and is not damaged in anyway. Any fraying, clips, kinks, or cuts means it will need to be replaced. If everything is normal replace the controller and motor in that order.
Error Code 19
Abnormal battery voltage detected.
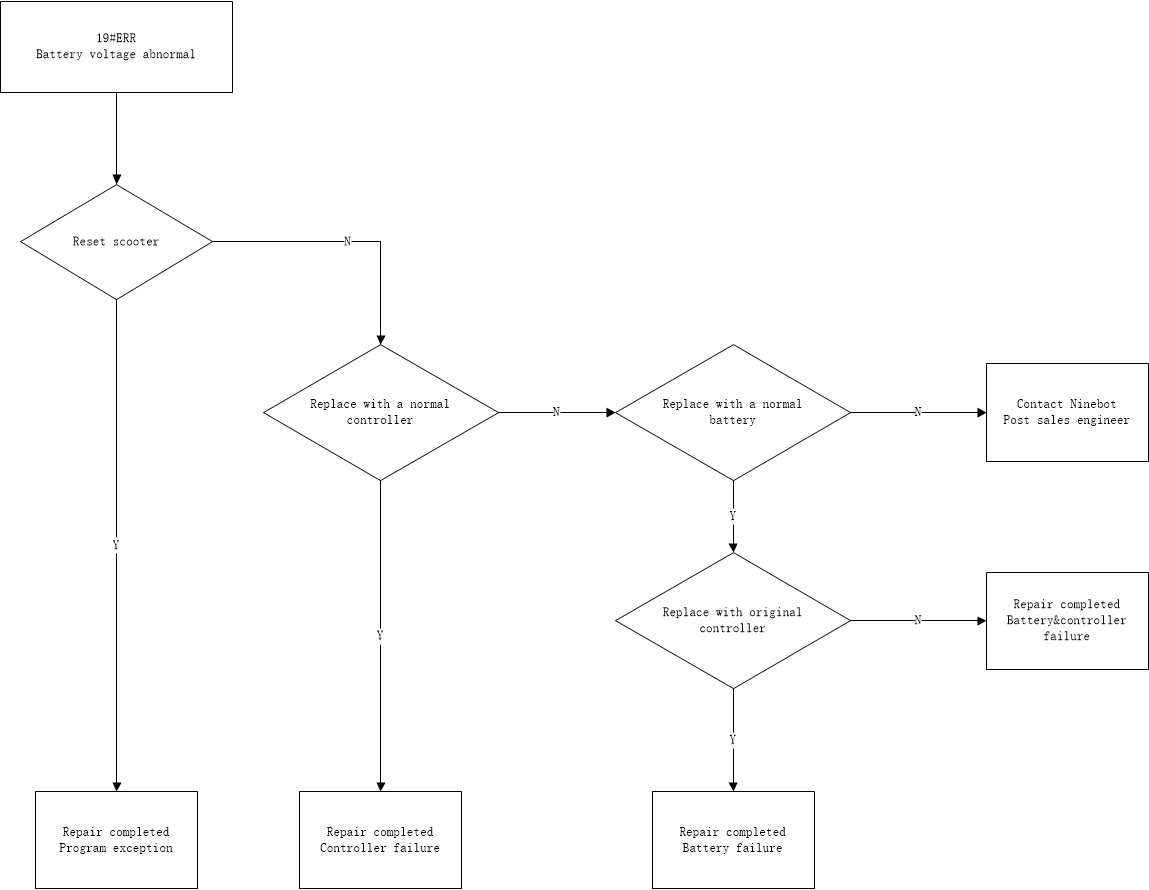
Error 19 is shown when the battery is under the correct voltage reading. When this happens the battery usually needs to be charged. The battery LED should do one of 3 things, turn solid red, flash between red and green, or turn solid green. If the LED is solid red, let the battery charge. If the LED flashes between red and green, Let it charge for about an hour and it should start to charge normally. If the LED stays green then replace the battery. If this does not work follow the outline below. Reset the scooter and if that does not work, replace the controller first and testing the scooter, followed by the battery.
Error Code 21
BMS communication error.
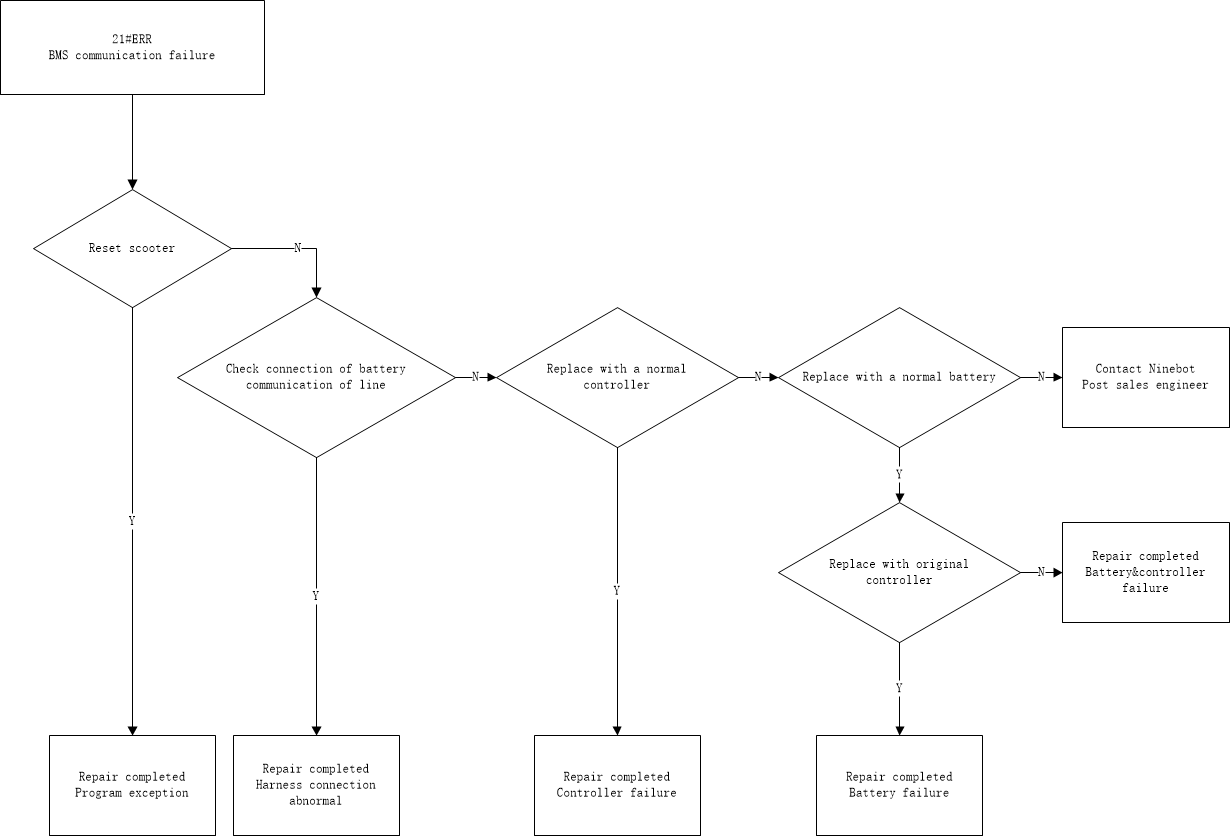
Error 21 is shown when the controller can not receive data from the BMS/Battery. Start by checking the battery communication connection. This is a 4-pin data wire that may need be plugged back in. It should click into place. Plug the scooter in for a few hours to see if the battery charges properly. Otherwise test the scooter with a working controller followed by a working battery.
Error Code 22
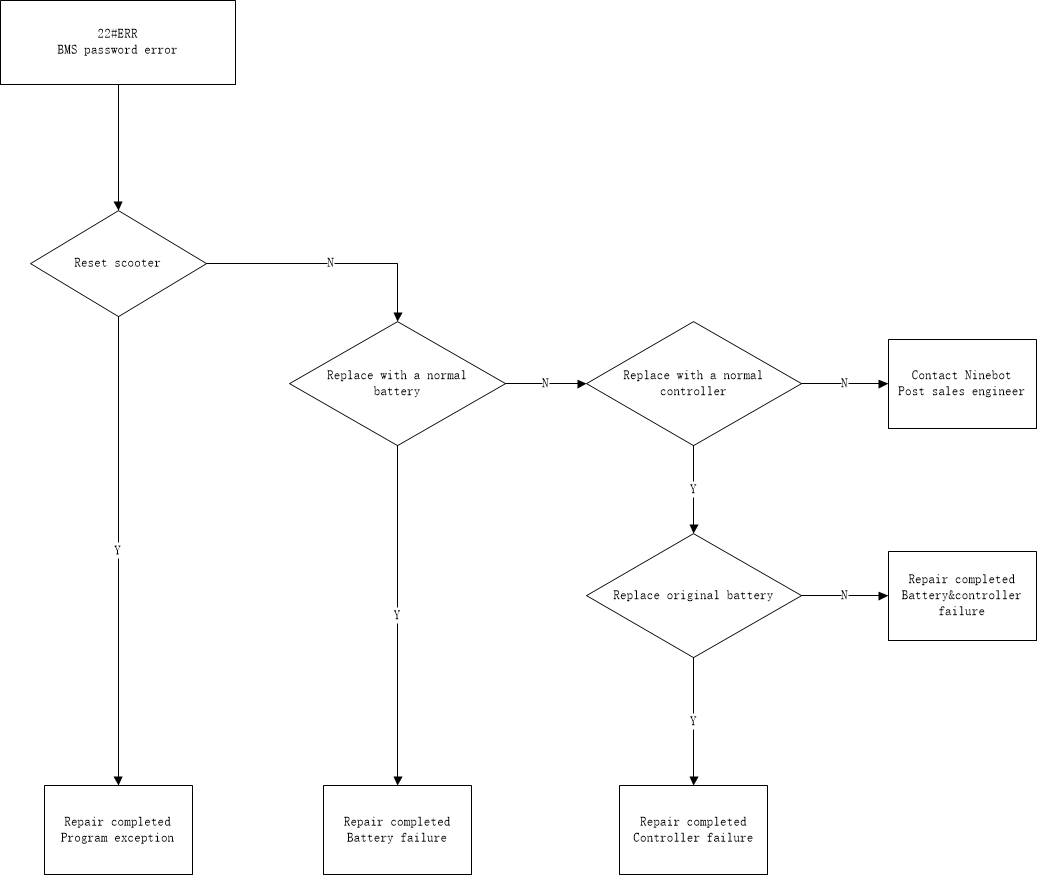
Wrong BMS password.
Error 22 is shown when a rental vehicles is not properly STLinked or has the wrong firmware version uploaded. A temporary fix would be to hold the throttle and brake briefly at startup to ignore this error. For a more permeant solution refresh the serial number is the Segway portal. If the scooter still does not work replace the controller followed by the battery.
Error Code 23
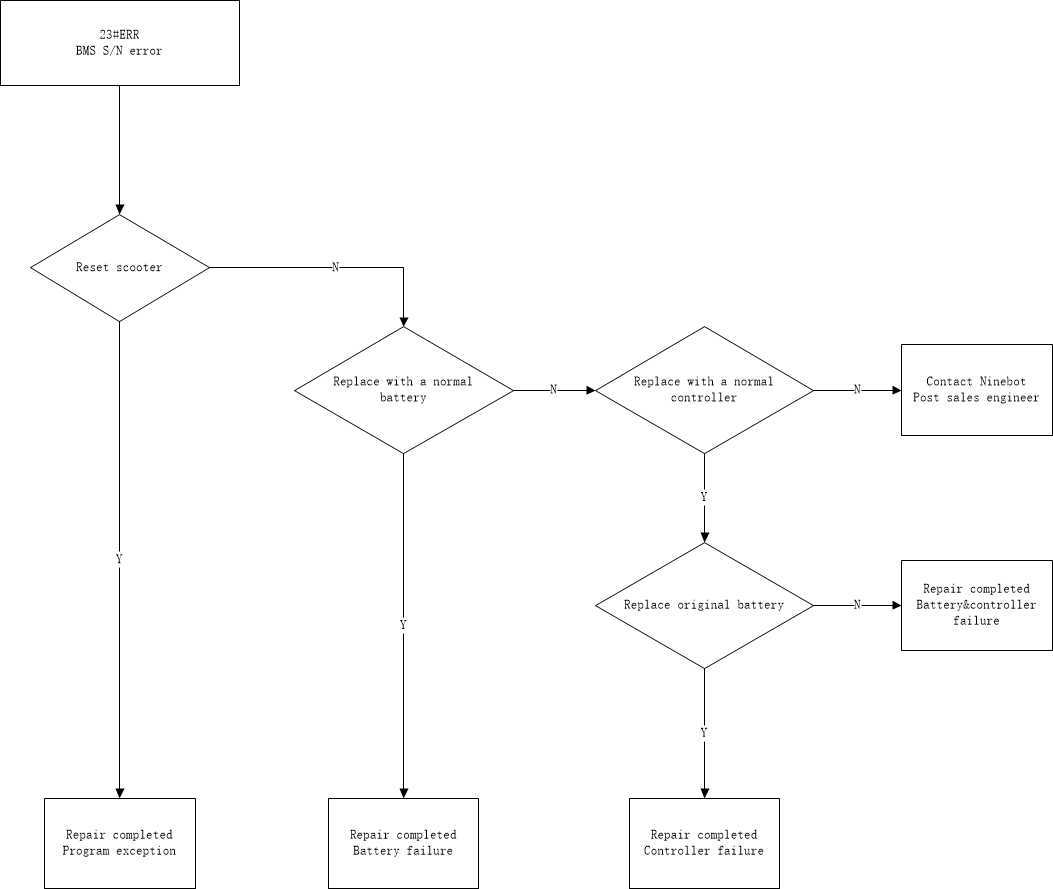
BMS default serial number.
Error 23 is shown when the battery's serial number has the default number. This is similar to error 35. The serial number can not be 3GA0016A1A0001. Fix this my changing the BMS serial number using the ninebot launcher app. Otherwise replace the battery followed by the controller.
Error Code 24
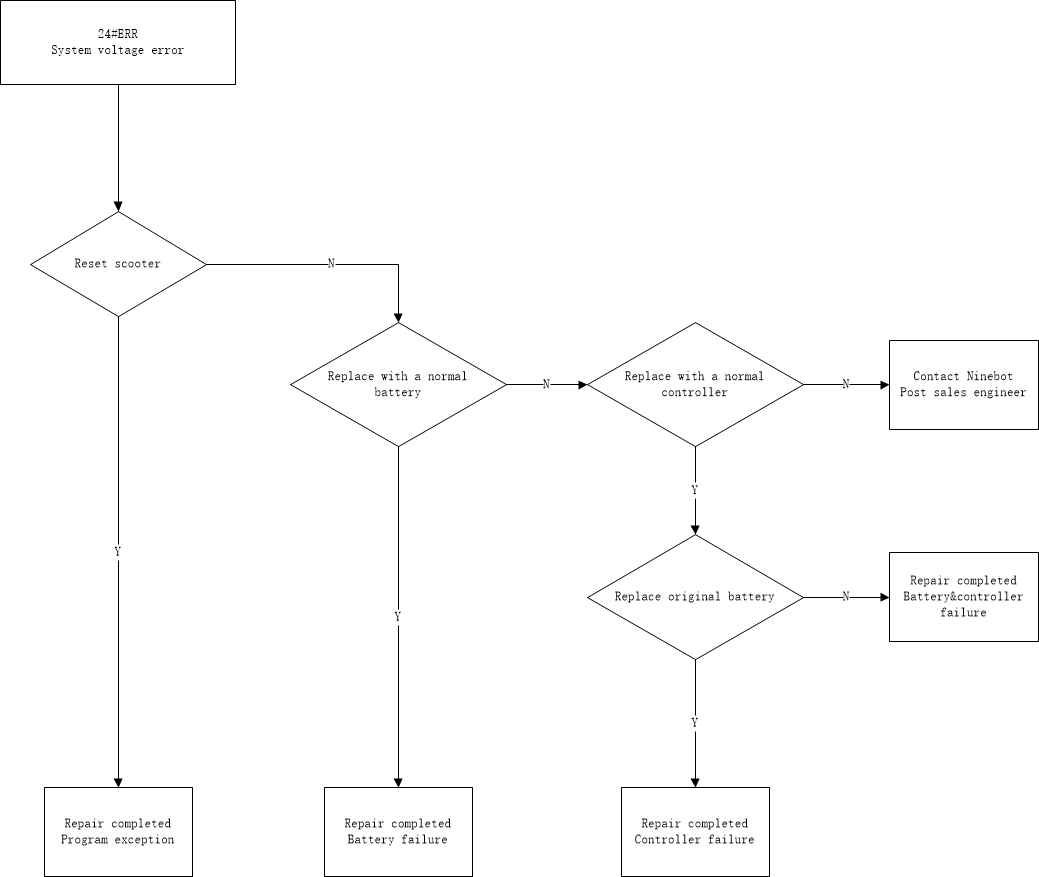
System voltage detection abnormality.
Error 24 is shown when the controller detects an abnormal battery voltage. This is most commonly happens when someone upgrades the battery. In some cases the battery may have become overcharged. If the battery upgrade caused the issue, upgrade the firmware on the controller to match the current battery setup. If the error happened without any pervious catalyst, the battery needs to be run down, recharged, or replaced. To tun the battery down leave the scooter on for a while and turn the headlight on to help run down the battery. If the voltage runs down and the error goes away, keep using the scooter until it is near 25% and then charge it fully again. If this or charging the battery does not fix the issue, follow the outline below and replace the battery followed by the controller.
Error Code 26
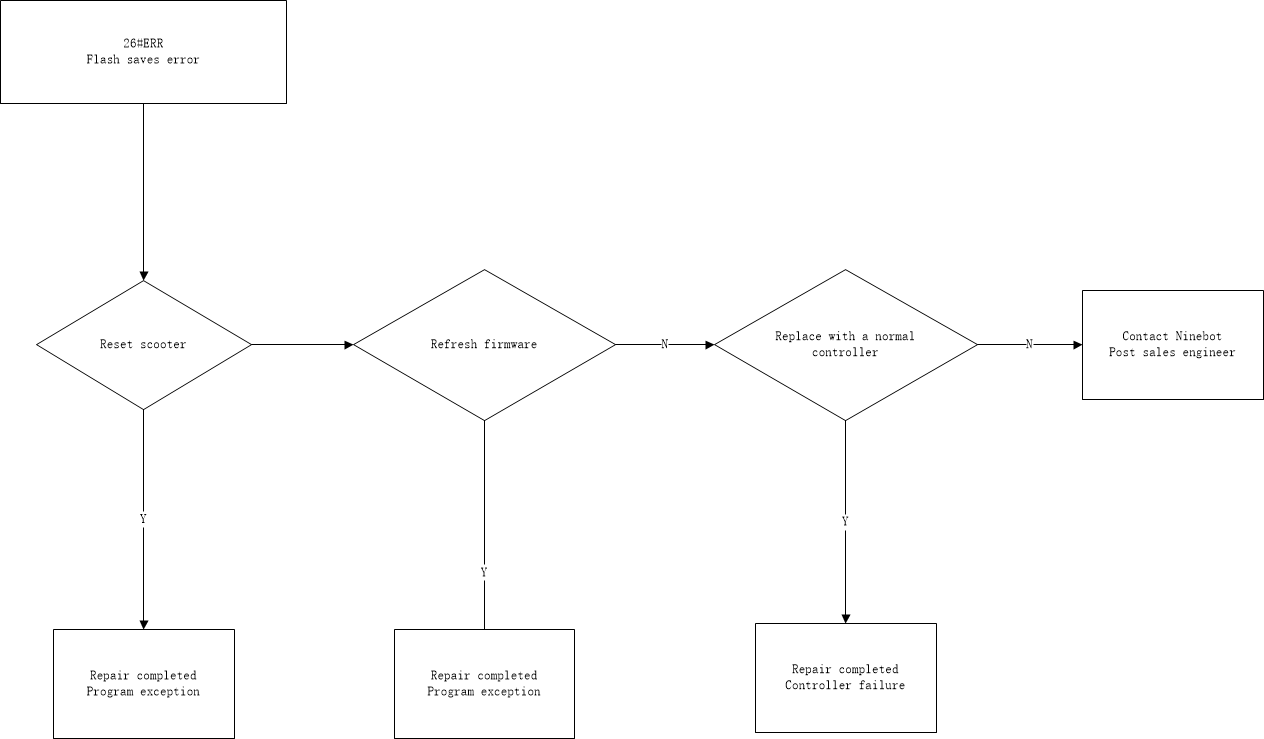
Flash saves error
Error 26 is shown there is an error with the controller. Start by resetting the scooter. If that does not fix your issue, update the firmware on the scooter and see if the issue is fix. If none of the above work, replace the controller.
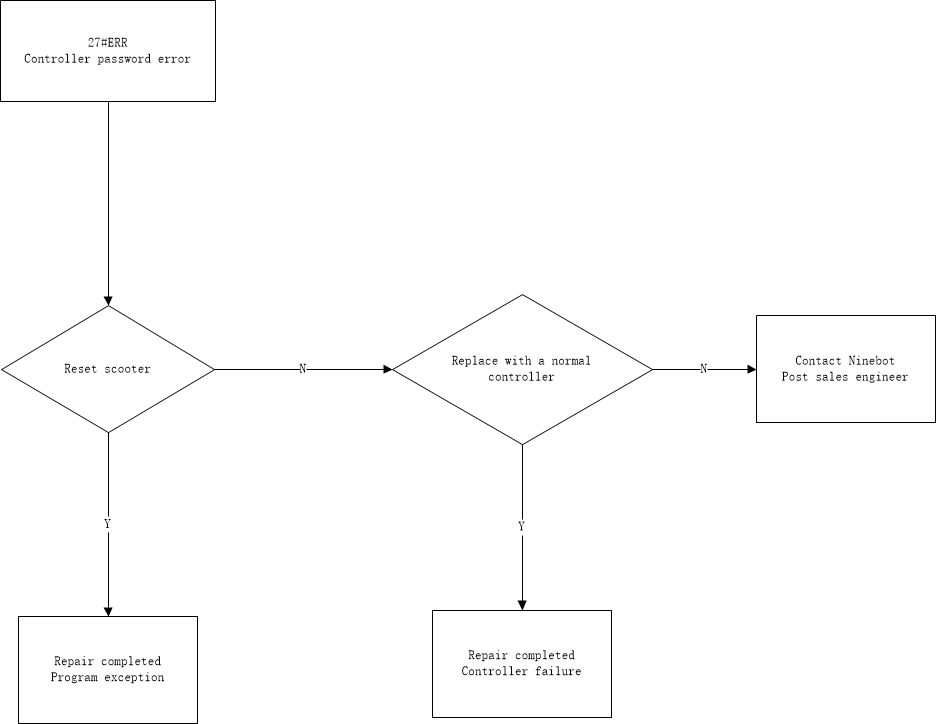
Error Code 27
Controller password error
Error 27 is shown when a rental scooter is not properly STLinked or has the wrong firmware version. It can also be caused by someone going through the serial change method. A temporary fix would be to hold the throttle and brake briefly at startup to ignore this error. For a more permeant solution refresh the serial number is the Segway portal. If the scooter still does not work replace the controller.
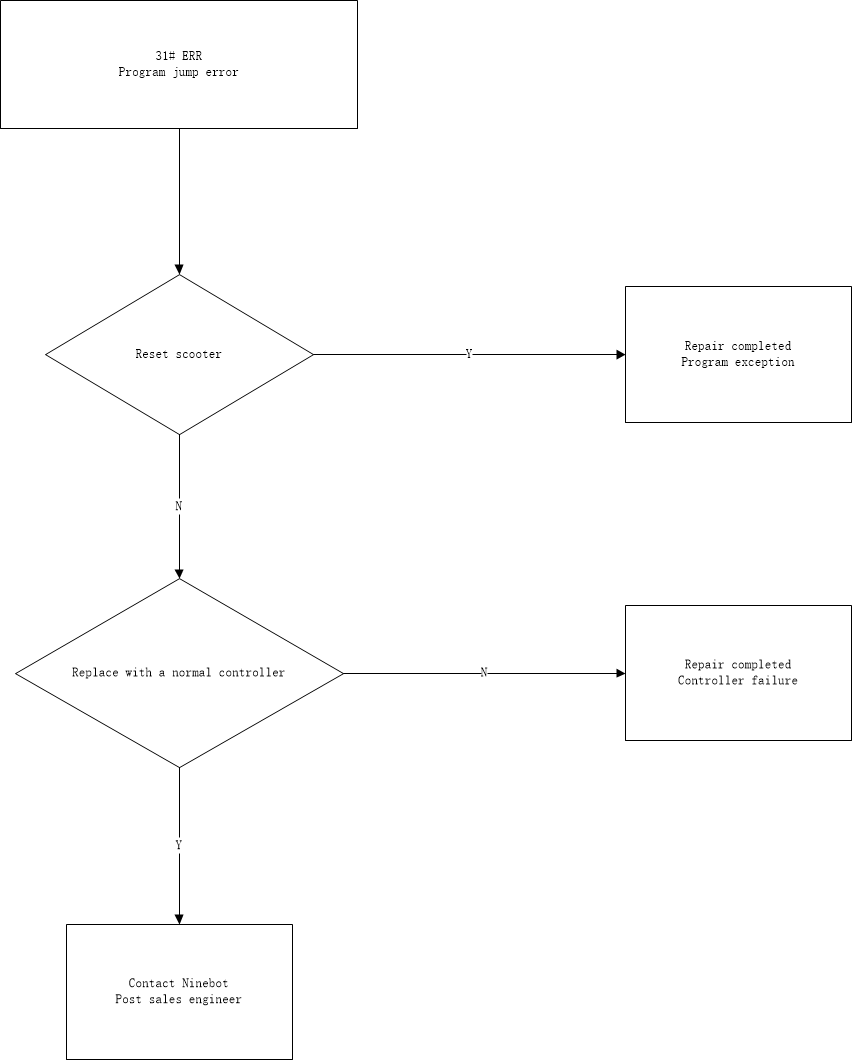
Error Code 31
Program jump error
Error 31 is shown there is an issues with the controller. There isn't much to do other than reseting the scooter, then replacing the controller.
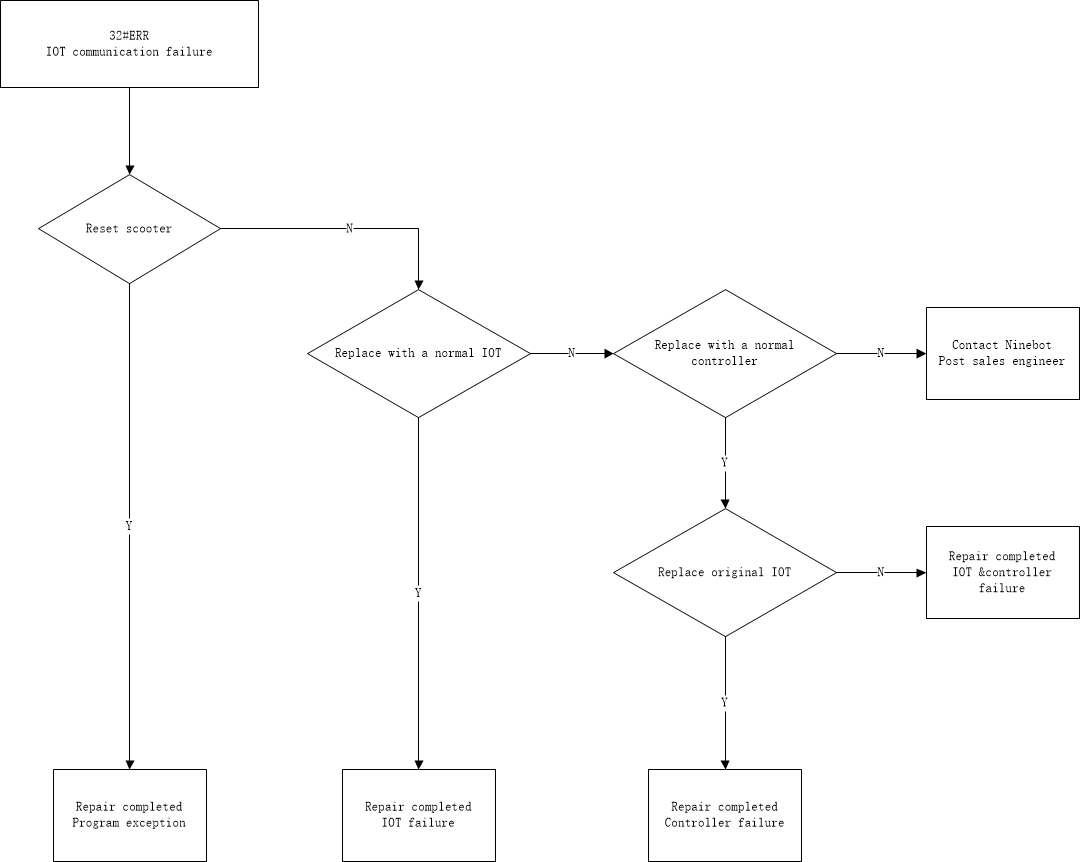
Error Code 32
IOT heartbeat timeout
Error 32 is shown on a rental scooter that can no longer detect the IoT device. you will first want to inspect the IoT device and be sure that the connection is free from fraying, clips, kinks, or cuts. If the connection wire is good, unplug and plug it back in and reset the scooter. If the issue still persists, replace the IoT followed by the controller.
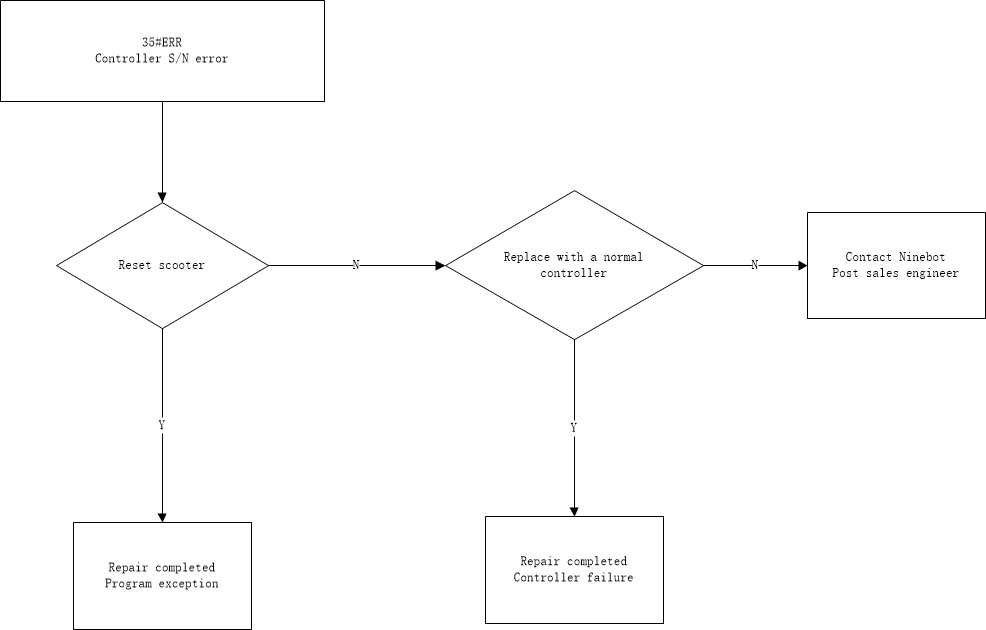
Error Code 35
Scooter with default serial number
Error 35 is shown when the controller's serial number has the default number. This is usually casued by a firmware. update. This is similar to error 23. The serial number can not be N4GEA1601C0001. To fix this change the controller's serial number using the ninebot launcher app. Otherwise replace the controller followed by the battery.
Error Code 37
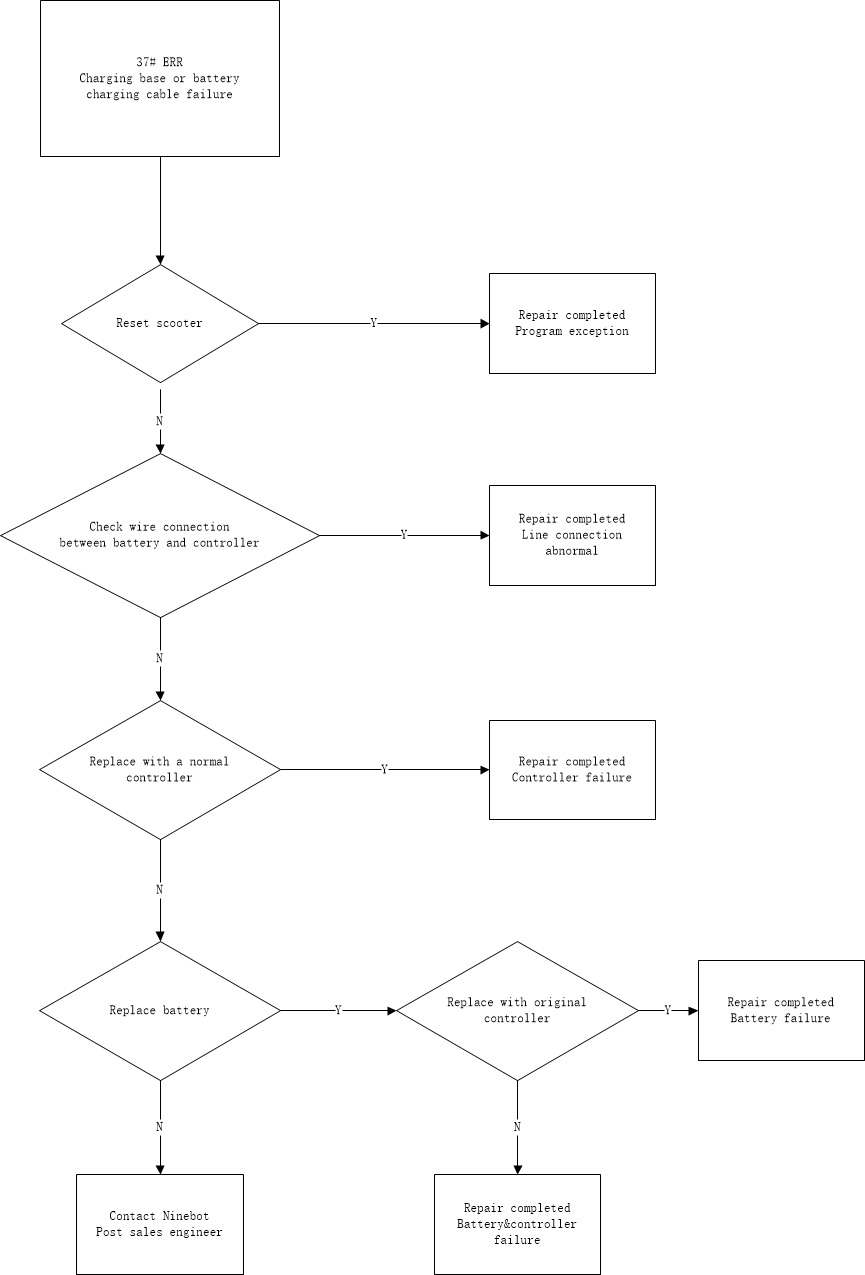
Charging base or charging cable failure
Error 37 is shown when the charging cable is failing. First try reseting the scooter to see if it fixes the problem. Next check the wiring from the controller to the battery. If any wire are frayed, clipped, has kinks, or cuts Replace the component it belongs to. If all the wiring is good start by replacing the controller, followed by the battery.
Error Code 39
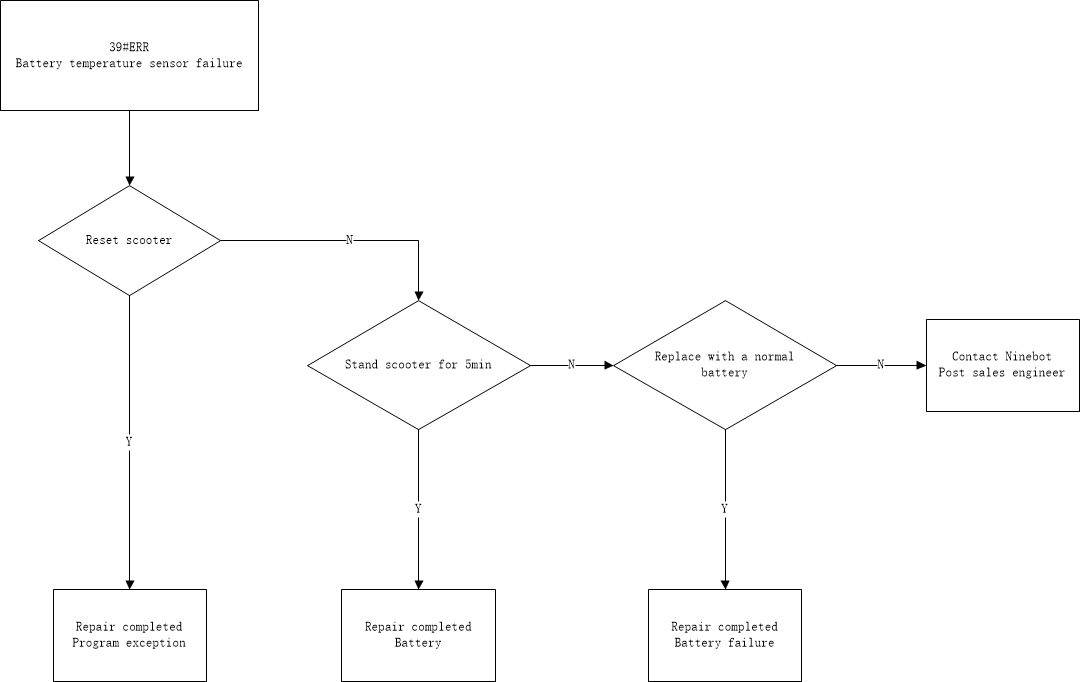
Temperature sensor abnormality
Error 39 is shown when the battery temperature sensor is reading outside of the normal levels. This could happen from the outside conditions too hot or too cold, or for no reason at all. First check the temperature of the battery with the Segway launcher app. If the battery is too hot let it cool down and if it is too cold move the scooter to a warmer temperature. If the temperature appears to be normal, restart the scooter. If the issue still persist change the battery.
Error Code 40
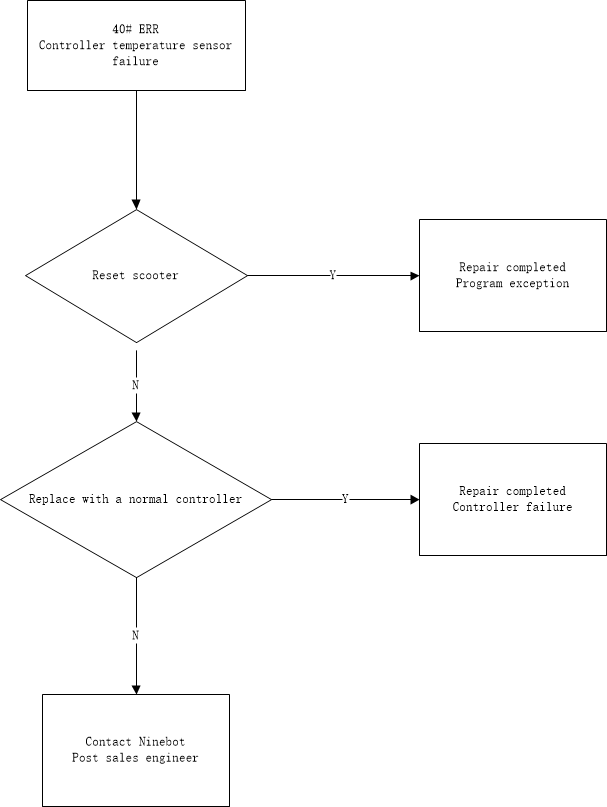
Abnormal temperature sensor of controller
Error 40 is shown the controller has gotten too hot and needs to cool down, but it may also be caused by the sensor coming disconnected or failing. Check the controller wiring for any fraying, clips, kinks, or cuts. Otherwise replace the controller.
Error Code 41
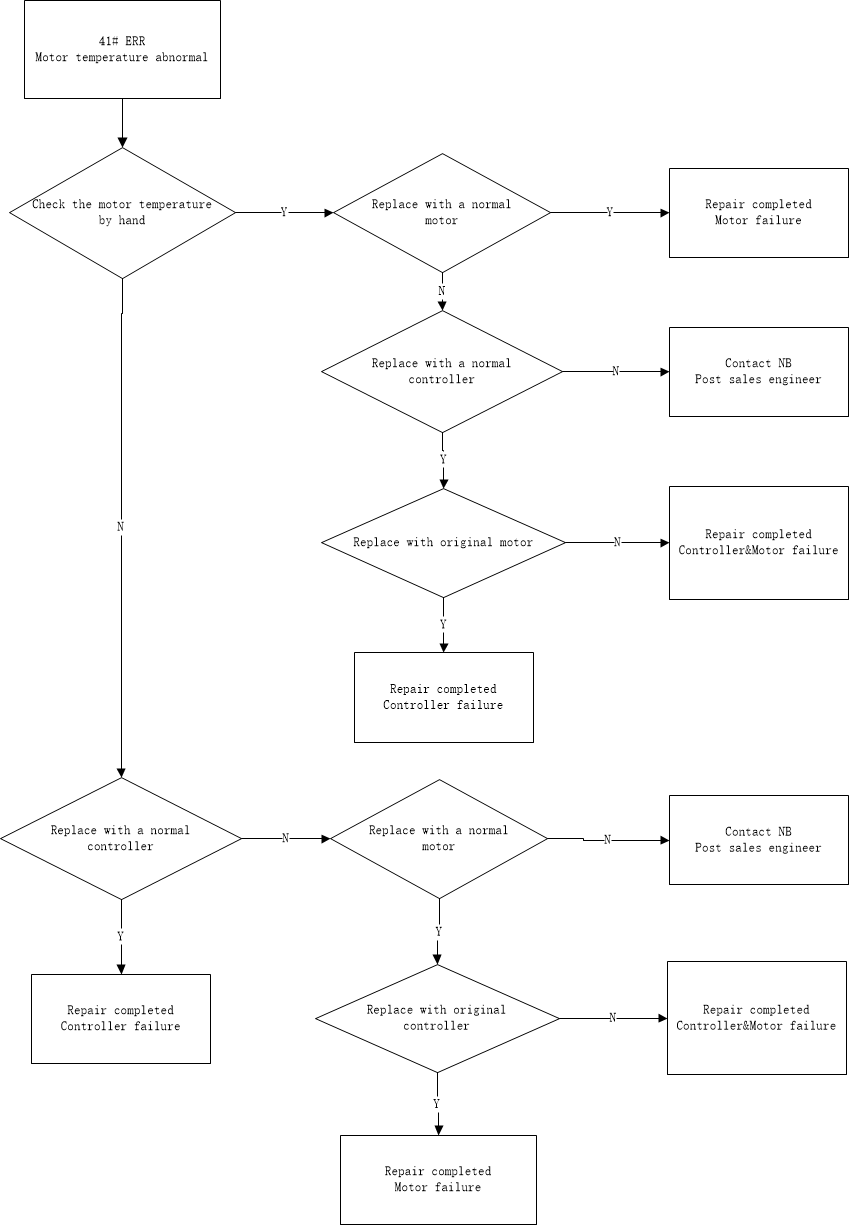
Temperature of the motor is abnormal
Error 41 is shown because the motor has gotten too hot and needs to cool down, but it may also be caused by the sensor coming disconnected or failing. Check the motor wiring for any fraying, clips, kinks, or cuts. Otherwise replace the motor.
Error Code 45
Scooter flashed with retail firmware
Error 45 is shown when a consumer scooter is updated with rental firmware. Some have reported success with moving the wheel slightly on startup. Otherwise you will want to try flashing the firmware to non-retail firmware.
There is no outline for this error code
Error Code 50
Either temperature sensor is outside normal parameters or the rental firmware has not ben setup properly.
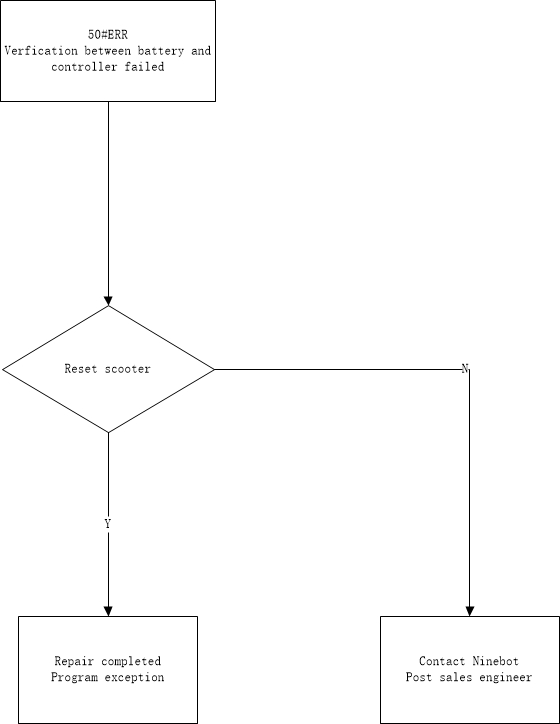
Error 50 is shown for one of two reasons. Either the temperature sensor is not reporting a proper value or the rental firmware that is being used has not been set up properly. Rest the scooter to see if that temporarily fixes the issue. For the rental firmware issue you will want to update the firmware to the IoT, the battery, and the controller.
Error Code 51
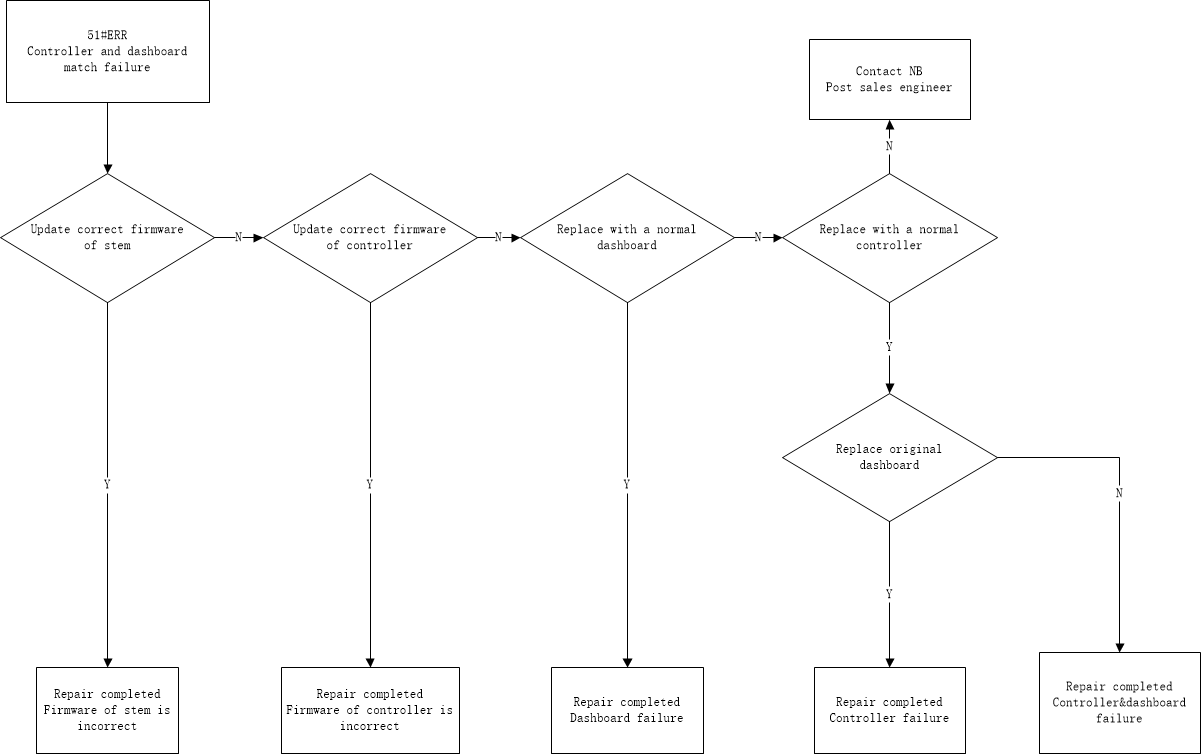
LCD and controller match failure.
Error 51 is shown when the firmware on the LCD does not match the. firmware on the controller. Start by updating the firmware of the LCD by using the connection in the stem. If the issue still persist, update the controller with the matching firmware. Should the issue still persist, replace the LCD followed by the controller.
Error Code 52
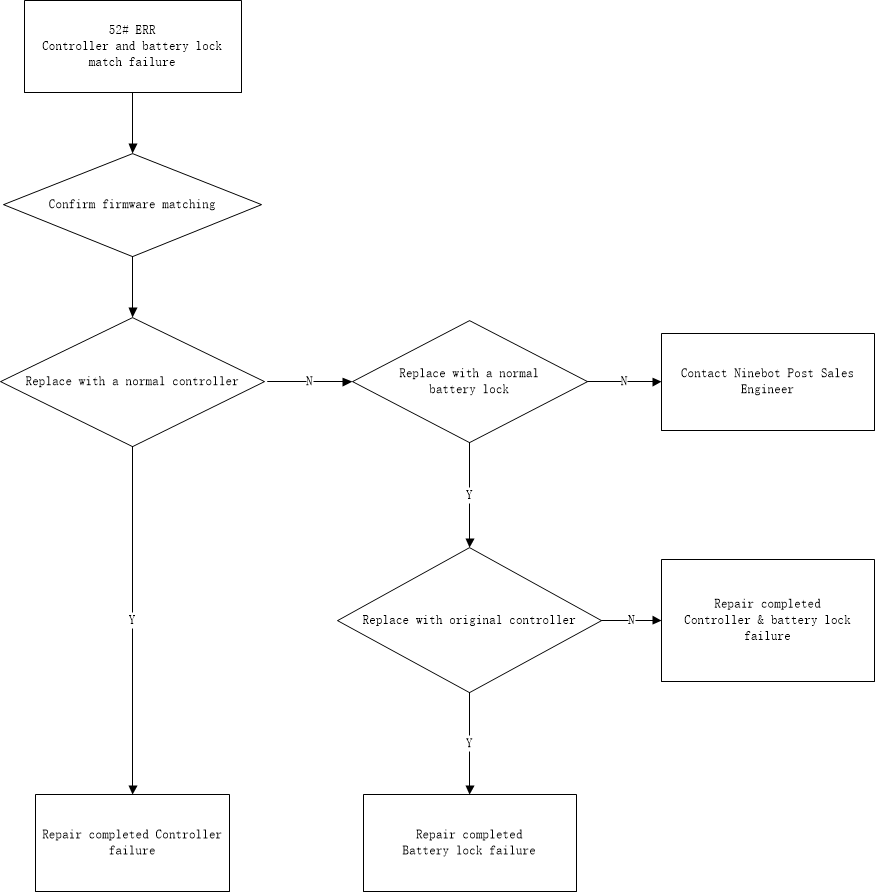
e-lock and controller firmware match failure
Error 52 is shown when the firmware between the e-lock and the controller do not match. Start by confirming that the two components have matching firmware versions. If this is true, then one of the components is bad and needs to be replaced. Replace the controller first, followed by the e-lock.
Error Code 54
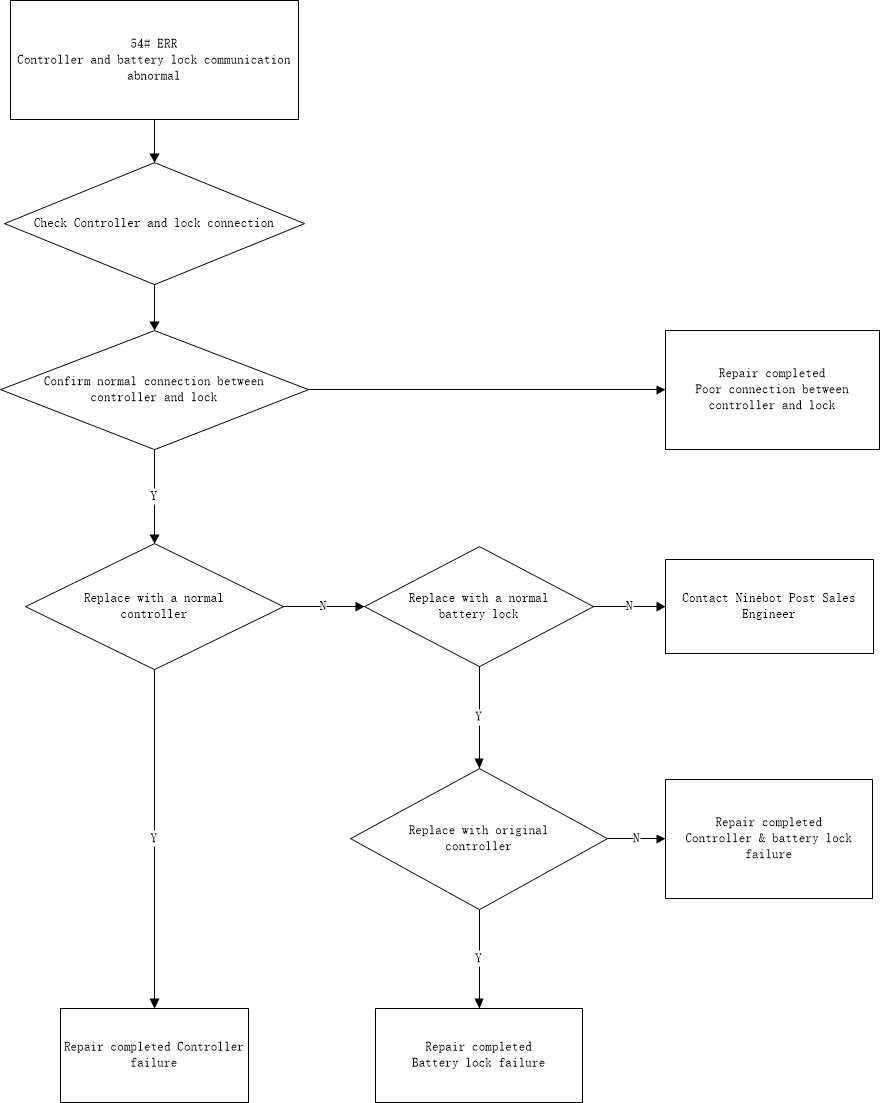
Communication Failure between e-lock and controller
Error 54 is shown when the controller and e-lock are not properly communicating with each other. Start by checking the controller and e-lock wiring. It should be free from any fraying, clips, kinks, or cuts. If any issues are found with the wiring, replace the affected component(s). If nothing can be found start by trying a new controller followed by a new e-lock.
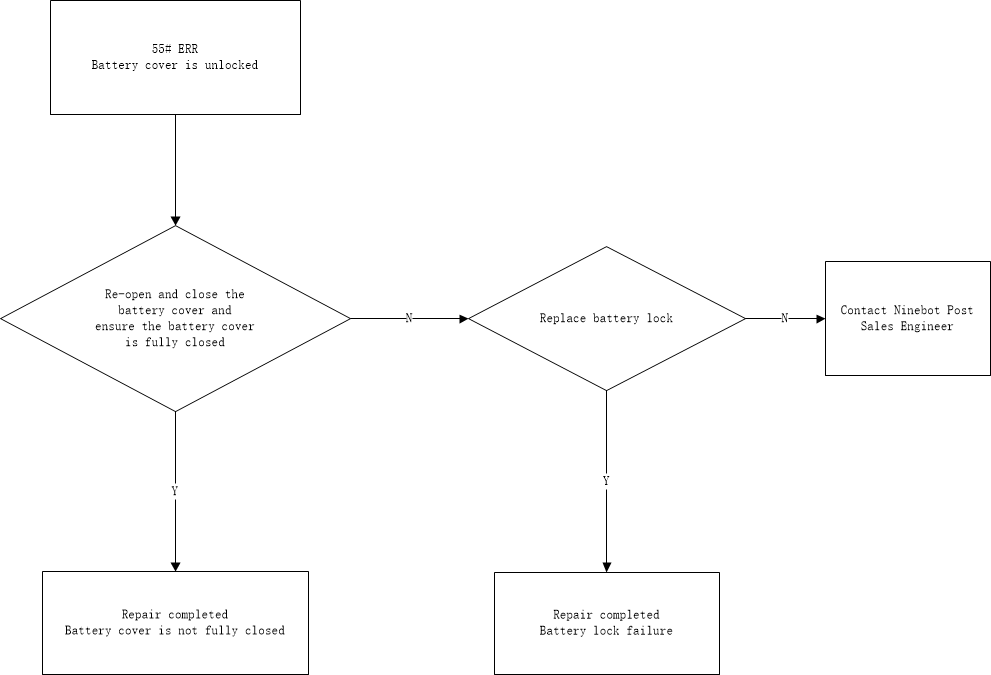
Error Code 55
Battery cover sensor failure
Error 55 is shown when the battery cover is not fully closed. Think of this error like a car door open signal, but with the battery cover. Start by reopening and closing the battery cover. Ensure the battery cover is sealed properly. Should the issue still persist, replace the battery lock.
Was this article helpful?
Related Articles
Fitrider TS10
Max. Speed: 30km/h (18.6mph) / Default: 25km/h (15.5mph) Typical Range: 60-65km Net Weight: 24.4kg (53.8lbs) Max. Loading: 120kg (264lbs) Tires: 10*2.5inch, front and rear solid tire. Motor (Nominal Power): Rear brushless motor,48V,500W Brake: Front and Rear dual-drum brake Max. Slope: 12°…
Why do app users get blocked?
There are a few different cases when your customers can find themselves blocked from using your service. 1) Too many profiles registered from one device - customers are being prevented from registering more than 5 profiles from one device ID in order to limit the fraud attempts potentially en…
Changing Default Payment Method In Rental App
Through the Levy mobile application, the customer will need to follow the following steps: Add new payment profile From the home screen, click menu button on top left corner of screen to open side bar tab. Select "Payment Method" Select "+ Add payment profile" Fill out name and address infor…


